- Install
- Download Tsumicky
- Launch Tsumicky
- Starting the Excel server
- Starting the RPA server
- Starting the misc server
- Writing firmware to microcontroller (ESP32 series/Raspberry Pi Pico W)
- How to use on Arduino UNO Q
- How to use on Raspberry Pi
- How to use on Raspberry Pi Pico
- Basic operation
- Basics of programming for electronic work
- Basics of programming for Excel
- Machine learning with scikit-learn
- Visualizing data with matplotlib
- Web programming
- RPA programming
- Miscellaneous programming
- Reference
Writing firmware to microcontroller (ESP32 series/Raspberry Pi Pico W)
If you want to operate the ESP32 series and Raspberry Pi Pico W with Tsumicky, use Arduino IDE to write firmware to the ESP32 etc.
Supported microcontroller
Compatible with the following microcontrollers.
- ESP32
- ESP32-C3
- ESP32-C5
- ESP32-C6
- ESP32-S3
- Raspberry Pi Pico W
- Raspberry Pi Pico 2W
Please note that Raspberry Pi Pico that does not have a "W" (no WiFi) is operated in a different way.
For instructions on how to use Raspberry Pi Pico, please refer to this page.
Please note that this is not compatible with Raspberry Pi Pico 2, which does not have the "W" (no WiFi).
Installing Arduino IDE
Use Arduino IDE to write the firmware.
Please install Arduino IDE on your computer.
Add board manager URL
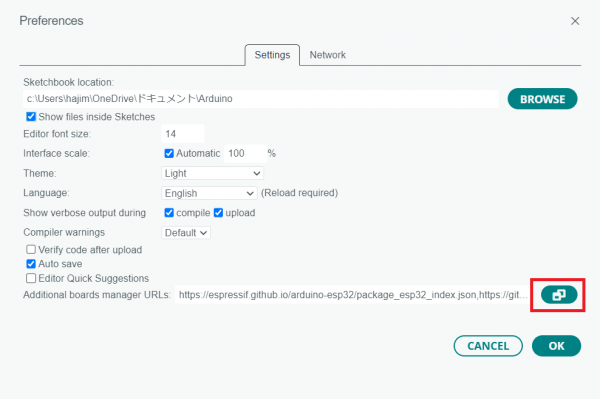
In the Arduino IDE, select the "File" - "Preferences" menu to open the basic settings dialog box.
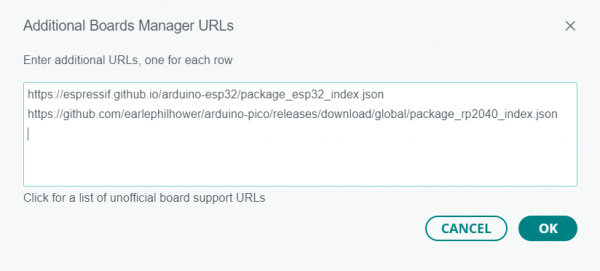
Then, click the button on the far right of the "Additional boards manager URLs" column and add the URL of the ESP32 or Raspberry Pi Pico W board manager.
The URL to add is as follows.
| Microcomputer | URL to add |
|---|---|
| ESP32 ESP32-C3 ESP32-C5 ESP32-C6 ESP32-S3 | https://espressif.github.io/arduino-esp32/package_esp32_index.json |
| Raspberry Pi Pico W Raspberry Pi Pico 2W | https://github.com/earlephilhower/arduino-pico/releases/download/global/package_rp2040_index.json |
Installing the board
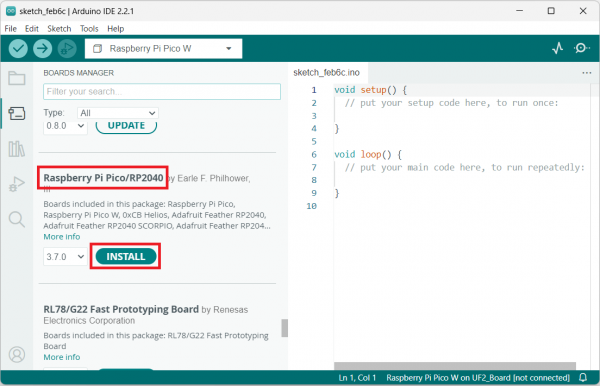
Open the Board Manager by selecting the "Tools" - "Board" - "Boards Manager" menu.
Select the board below from the list of boards and click the "Install" button.
| Microcontroller | Board to install |
|---|---|
| ESP32 ESP32-C3 ESP32-C5 ESP32-C6 ESP32-S3 | esp32 |
| Raspberry Pi Pico W Raspberry Pi Pico 2W | Raspberry Pi Pico/RP2040 |
Installing the library
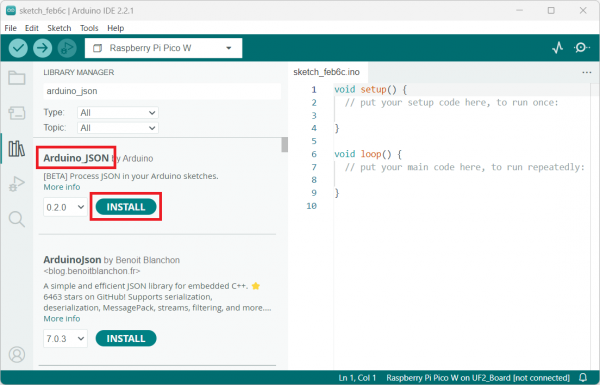
Open the Library Manager by selecting the "Tools" - "Manage Libraries" menu.
Install the following libraries using Library Manager.
Please note that "Arduino_JSON" also has a library with a similar name called "ArduinoJson", so please be careful not to confuse it.
| Library | Search keyword |
|---|---|
| WebSockets | WebSockets |
| Arduino_JSON | arduino_json |
| ESP32Servo | esp32servo |
| Adafruit PWM Servo Driver | adafruit pwm |
| Adafruit NeoPixel | adafruit neopixel |
| LiquidCrystal_I2C | lcd |
| U8g2 | u8g2 |
| Adafruit BMP280 Library | adafruit bmp280 |
| DHT Sensor Library | dht |
| FastIMU | fastimu |
| MAX30100lib | max30100lib |
WiFi SSID and password settings
Select the "File" - "Open" menu to open the firmware sketch.
The "tmkfirm.ino" file located in the "firmware" - "tmkfirm" folder in the Tsumikky unzipped folder is the sketch file.
After opening the file, change the following two lines at the top to match your WiFi SSID/password.
const char* ssid = "your_ssid";
const char* pass = "your_pass";
For example, if the SSID is "mywifi" and the password is "12345", rewrite it as follows.
const char* ssid = "miwifi";
const char* pass = "12345";
Writing firmware
Connect the ESP32 etc. to the computer with a USB cable.
From the "Tools" - "Board" menu, select the board that matches the microcontroller to which you want to write.
From the "Tools" - "Port" menu, select the serial port to which the microcontroller is connected.
Then, select the "Sketch" - "Upload" menu to write the firmware.